
Beginners Guide to a Basic ComfyUI Workflow
How to generate your first ComfyUI/Flux image

So you have got to grips with the installation of ComfyUI, can successfully launch it and you are presented with a mainly black browser window with some boxes and spaghetti in the middle of it. Now what?
Depending on which instructions you have followed for installing ComfyUI you may have downloaded some of the necessary files already but if not, before we get into a workflow, let’s cover the key model files you will need. A very good reference for installation, model information and sample workflows can be found on the ComfyUI Wiki which I will make reference to.
Workflows are what tie everything together in ComfyUI — a bit like a ‘live’ flowchart. The boxes are ‘nodes’ where the action happens and the spaghetti connects the nodes together to create a flow. A simple workflow may only have half a dozen nodes, more advanced workflows may have hundreds — that’s the beauty of ComfyUI it can deal with the simple and expand to highly complicated set-ups with a large range of advanced features.
The Flux ‘txt-to-img’ workflow template which is installed with ComfyUI is very basic and uses a single ‘checkpoint file’ which combines versions of the required model files. This approach of one combined file is convenient but a little too restrictive so I will describe a flow which uses separate model files as follows:
Core Diffusion Model (Unet model)
There are many different models available but let’s start with the base Black Forest Labs model of Flux.1 Dev. If you have 12GB or more of VRAM on your graphics card and at least 16GB of system memory then I would suggest the standard FP16 model linked below.
If you find that doesn’t work or is too slow then you can drop down to an FP8 or quantised version such as the Comfy Org version below.
These files need to be placed in the \ComfyUI\models\unet folder.
Clip loader
The second key file is the CLIP model. The CLIP (Contrastive Language-Image Pre-training) model is what the text encoder uses to transform prompt text into numerical representations that are used by the diffusion model.
It’s quite usual to use two CLIP models which are optimised for different aspects of text encoding. One of the downsides of using a single checkpoint file is that it can be difficult to know what CLIP model or models have been included whereas when using the separate Dual Clip Loader node you have full control.
Two popular CLIP models for Flux are:
clip_l — A model which is optimised for comma separated lists of tags.
t5xxl — A model which excels at natural language in the form of full sentences.
If you have 16GB or more of VRAM and at least 32GB of system memory then you can use t5xxl_fp16, otherwise use t5xxl_fp8_e4m3fn which is half the size but does sacrifice some quality.
https://huggingface.co/comfyanonymous/flux_text_encoders/resolve/main/clip_l.safetensors
https://huggingface.co/comfyanonymous/flux_text_encoders/resolve/main/t5xxl_fp8_e4m3fn.safetensors
https://huggingface.co/comfyanonymous/flux_text_encoders/resolve/main/t5xxl_fp16.safetensors
These files need to go in the \ComfyUI\models\clip folder.
VAE Model
Next up is the Variational Autoencoder (VAE) model. This is a generative model that ‘learns a compressed, probabilistic representation of data, allowing it to both reconstruct the original data and generate new, similar data samples’. That all sounds grand and complicated, I tend to think of it as the model that bridges between the latent image that the diffusion model creates and the pixel based image which is output.
A VAE has both an encoder which can translate to a latent image and a decoder to translate back to a pixel based image.
This file needs to go in the \ComfyUI\models\vae folder.
The Workflow
Now lets get onto the workflow itself. I’ll use the example Flux Dev workflow from Comfyanonymous — you can drag the image directly onto ComfyUI in a browser as the PNG image has the workflow embedded into it or alternatively you can right click, save the image first and then drag the saved file onto ComfyUI. The ComfyUI Wiki also has a link to the same workflow as a JSON file via a download button named ‘Flux Dev ComfyUI workflow example’
Once loaded the screen should look something like the image below.

Starting from the top left the ‘Load Diffusion Model’ node should be set to the model file you have downloaded, the weight can be left at default.
Below the Load Diffusion Model node is the Dual Clip Loader, set clip_name1 to the t5xxl file you downloaded and set clip_name2 to clip_l.safetensors
Below the Dual Clip Loader node is the Load VAE node, this should be set to ae.safetensors. Moving to the middle column the next editable option is the Flux Guidance.
Flux Guidance
Flux Guidance is a very important setting controlling how closely the diffusion model follows the text prompt. Higher values force strong adherence, lower values allow the AI model more creative space but other factors come into play, it is often suggested that short text prompts work better with a higher Flux Guidance and long text prompts work better with a low Flux Guidance value.
You will often see Flux Guidance set at 3.5 as the default, however, what you set it to will depend on individual prompts and other workflow settings. In theory Flux Guidance can range from 0 to 100, where it lands is a bit of a black art. There are many views, often conflicting, so the best thing is to experiment. Apart from a couple of very specific examples I have rarely set the Flux Guidance above about 4 or 5 and most of the time for photo realistic images I have it below 2 as this tends to output more realistic skin textures and tones down the contrast and saturation, however, sometimes adding a LoRA in (or using a refined model) upsets the balance and I find I have to increase the Flux Guidance a bit. Like with many things in AI image generation there is no single right answer, everything is entwined and linked so you just have to iterate until you get the result you want. For this example we’ll start wth 3.5.
CLIP Text Encode
As this is a text to image workflow the CLIP Text Encode node is going to carry the detail of what we want the image to look like. It is generally said that Flux likes longer, detailed prompts written in full sentences — you will see though text prompts which are just a list of keywords, and these still work but the model will use its own creativity more freely.
Writing good text prompts is a skill in itself and takes practice, as with the Flux Guidance the trick is to iterate, you don't need to get a perfect prompt on the first run.
There are a few pointers to help:
Be careful of contradictions in a long prompt as they are likely to confuse and create odd output.
Officially Flux only has a ‘positive prompt’ whereas Stable Diffusion has both a positive and negative prompt (meaning you can call out what you do not want). Some workflows implement different approaches to try and achieve a negative prompt but the key point is not to try and say what you do not want in the positive prompt because if you do you will almost certainly get the reverse of what you want!
Capitalisation can make a difference, especially when dealing with proper names, for example when referring to a style or brand.
Text is problematic for all AI image generators — you need to be very specific on location and may need to increase the Flux Guidance. Running the same prompt multiple times may eventually get you what you want in terms of the actual text accuracy and position.
What you don’t specify the model will use a default or interpret, so the more you describe — lighting, style, camera angle, clothing, even camera settings, etc. —will guide the model to your vision of the image.
For this example we will use a very simple prompt:
“High quality photograph taken on spring evening in a beautiful English country garden, a man and a woman are sitting each side of a garden table with wine glasses in their hands with a bottle of red wine on the table”
Below the CLIP Text Encode are two settings for Width and Height. The maximum image size for Flux.1. Dev is 2MP but you can use any ratio within that limitation. A 1:1 ratio of 1024 x 1024 is often used but ratios such as 16:9 (1920 x 1088) or 4:3 (1664 x 1216) work just as well. Stepping outside of the 2MP limit will most likely give you a memory exception error.
The EmptySD3LatentImage node is what creates the container for the image, it has a batch setting which defaults to 1 so that only once image is created — if you have enough VRAM and system memory you can increase the batch size to create multiple images at the same time (obviously with a speed impact). Until you have optimised your settings and worked out what your set-up can handle it is best to keep this set at 1.
The RandomNoise node is where the ‘seed’ is set, the actual value does not matter, the important fact is whether you want it to randomly change each time, increment, decrement or stay ixed. The relevance is that if you want to try and keep a consistent generation you need to fix the seed, otherwise with a different seed the image will definitely change, although even with a fixed seed you may see some variation between runs.
Samplers & Schedulers
The sampler and the scheduler used in the image generation process are part of the magic which creates a viewable image from noise, but what do they actually do?
The sampler defines how the denoising of the image is performed and for Flux there are a number of different samplers — DPM, DEIS, and Euler to name a few — and they all have slightly different characteristics.
The scheduler, as the name suggests, controls the timing and intensity of the denoising steps. Flux schedulers include Normal, Simple, DDIM and Beta.
This area gets complicated and very mathematical so it worth noting two key points:
Note all schedulers work well with every sampler — there are good and bad combos. Good combos I have seen called out include euler / beta, deis / ddim_uniform and dpm_2 / beta but there are plenty of others.
There are various online comparisons which show that for the majority of the good combinations as the number of steps increases they all trend to producing very similar output.
My default tends to be euler / beta and if I can’t get the result from that I’ll try something else. For the purposes of this simple workflow we will stick with euler / beta so:
KSamplerSelect is set to euler and Basic Sampler is set to beta. The number of steps is the number of iterations the denoising process goes through and 25 is a standard starting point, too few steps and the image will look noisy, too many just means it will take longer with no great improvement. There are ways to reduce the number of steps to 8 or 16 (more on that in a future article) but 20–35 is the typical range.
The denoise value controls the intensity of the denoising with a range of 0 to 1, with 1 representing full denoising. Changing this value is a more advanced topic so we leave it at 1.
The ModelSamplingFlux node deals with how much the model can deviate from its defaults using a base_shift and a max_shift, this is a more advanced topic so we will leave it at the default.
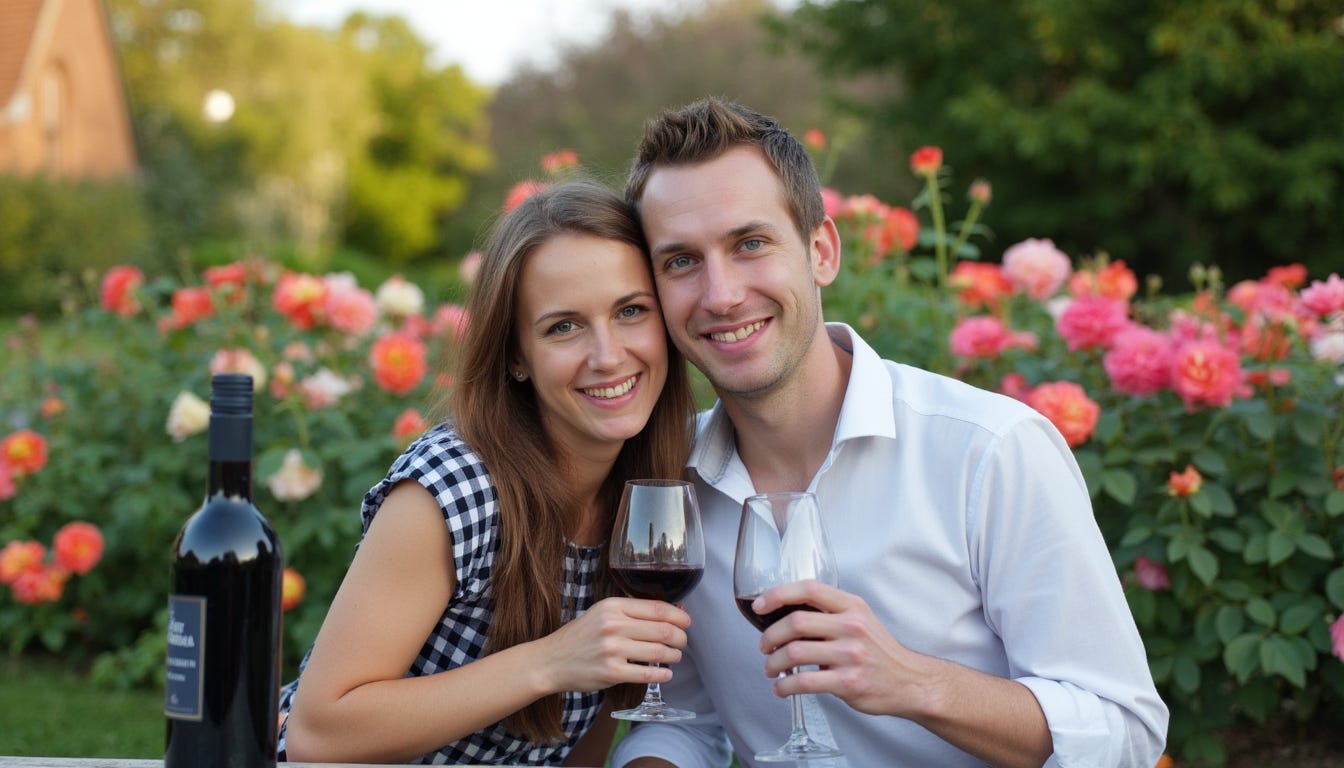
Now we should be ready to click ‘Queue’ and wait for the image to generate, which depending on your set-up may be a matter of 20 seconds or several minutes. Hopefully you should end up with something similar to the image below if you used the same prompt and the same seed.

On first glance the image looks pretty good but there are some AI giveaways — the depth of field is low giving a blurry background, in some cases that may be desirable but Flux will tend to default to this on a lot of images. The writing on the wine bottle is gibberish and the facial expressions of the couple are a bit false. The image in general looks a little too polished as if staged by a professional photographer.
What about if we want something a little more natural. As this is a simple introduction I’ll keep the tweaking straightforward, the main element being to refine the prompt. You will notice that any change to the prompt, no matter how small, is likely to generate an entirely different image, it’s as significant as changing the seed.
The revised prompt is:
“Casual iPhone photograph taken on a spring evening in a beautiful English country garden with colourful roses in the background. A man and a woman, who are the focus of the photograph, are sitting each side of a garden table each holding a wine glass. The couple are looking towards the camera with natural and relaxed expressions. A bottle of red wine on the table has a label with the text ‘South Australia, Malbec’.”
In addition to enhancing the prompt, I have also regenerated the seed and changed the image format to 1344 x 768. I often find changing the image aspect ratio can drive some quite different outputs. I have kept the Flux Guidance at 3.5.

So now we have a slightly better depth of field (although still limited) and a more natural looking image. The adherence isn’t great though as we have lost the table and the text is still not correct on the wine bottle but at least you cannot read it. If you try multiple iterations sometimes it will add the correct text.
As a comparison the next image uses the same prompt but a more advanced workflow with a LoRA to reduce the background blur, along with a refined model, in this case Colossus Project Flux v5.

The LoRA has reduced the background blur and finally we have the correct text on the wine label! Overall the image looks a little more realistic, slightly sharper, with better skin detail.
As you can see even a basic workflow can generate some excellent images, in future posts I’ll cover more advanced techniques including LoRAs, detailing and multi-stage sampling. When I first opened ComfyUI a few months ago it was an alien world but after diving in and experimenting you soon get to grips with the settings and more common nodes.