
Comfy UI — Installation Basics
The not too technical view of installation of ComfyUI with some common gotchas


Hardware — How Much Memory?!
So you can run ComfyUI on a PC (or Mac but this will focus on PC), but not any PC. Diffusion models are big and running them is very demanding on certain elements of a PC, not surprisingly the graphics card is the most important element.
I started with a tower PC which had an Intel 14th generation i7 processor, Z790 chipset and 32GB of memory but an old Nvidia GTX1050Ti graphics card with only 4GB of VRAM. Amazingly with the right tweaking and settings I could actually get images to render, but it was slow — around 30 minutes for a basic image and anything more complicated was going beyond an hour! I was limited to smaller models and often hit memory exception errors.
A new graphics card was needed. Choosing a graphics card is a minefield with a lot of contradicting opinion online, most of which relates to gaming rather than AI processing, which has different needs. Because of the size of the diffusion models (which get loaded into the graphics card VRAM) the memory size of the graphics card is as important as its overall processing power — not enough memory and the processing will either fail with a memory exception or offload to main system memory which is very slow in comparison.
I decided 16GB of VRAM was the sweet spot between performance and cost (it is only a hobby) and settled on an Nvidia RTX 4060 Ti OC. It is not the fastest card out there but the 16GB of VRAM is an advantage over cards which may have more CUDA cores (the key bit that does the actual processing) but only 12GB of VRAM. You’ll see complaints that the 4060 has a reduced memory bus which although true is really not significant for AI processing (and probably not for most gaming either!). If money is no object then a 24GB card would be even better. In terms of cost/benefit return an overclocked 4060 Ti is a pretty solid choice.
If it is not obvious already, ComfyUI only really works with Nvidia graphics cards as it makes heavy use of the CUDA cores. There are in theory some ways of getting it to work on AMD GPUs (only on Linux at the time of writing) and even Intel ARC GPUs but this is not something I have looked at, and given even on Windows with an Nvidia card there are challenges, adding a non-Nvidia card into the mix sounds like a whole world of pain, especially when the performance is unlikely to be anywhere close to the Nvidia cards.
The only other change I made to my PC was to increase my system memory from 32GB to 64GB of DDR5. Although this was not an essential change (I would say 32GB is the realistic minimum) I do find it has improved performance and reduced memory errors as ComfyUI can offload certain aspects and I often see the system memory being used at 80% capacity or more when running image generation.
The main system CPU is not that significant as it is the graphics card which does the heavy lift of processing, however, there are certain functions which do use the CPU so a reasonable processor is needed.
In terms of disks I expect any good SSD will be OK but you are moving lots of data around when the models are loaded onto the graphics card. With base models being over 20GB and the likelihood you will download a number of them, plenty of space is required and the faster the disk the better. I’m using 2 x PCIe Gen4 NVMe 1TB disks, one for the OS/software and one for the data.
With this set-up, along with some BIOS and software tweaks, in general it is taking me around 30–60 seconds to produce a basic high-quality generation. This does depend on a number of factors and can rise to 400+ seconds when doing complex detailing, controlnets, upscaling, etc. but feels like a reasonable generation time without spending mad amounts of money to gain a few seconds.
Installation — Do I need to know Python? No, but sort of Yes
ComfyUI will run on Windows, Linux or MacOS and makes heavy use of Python. There is no need to be a Python developer but a basic understanding of the way Python works in terms of installing packages definitely helps. In general the packaged installers (and ComfyUI Manager once installed) take care of most of it but I do find myself having to use PIP installs and uninstalls to sort out version conflicts. The most important point when installing is to know whether your machine already has a version of Python installed (or remnants of one) as this is most likely to cause issues.
While we are on the subject of what you need to know then a basic understanding of GitHub is advantageous. GitHub is a hugely popular software code repository and collaboration tool where the vast majority of ComfyUIs custom nodes reside. The ComfyUI Manager takes care of most of this but there are occasions when knowing how to do a manual ‘Git Pull’ can help overcome an issue.
There is no point in me writing another detailed installation guide so I’ll focus on a some tips and issues I ran into and provide a link below to an install guide.
Most of the installation guides like How to install ComfyUI — Stable Diffusion Art will tend to push towards using the standalone packaged version which creates a portable instance including Python — this is ideal as it keeps everything together and independent of anything else. All my experience is on using the Windows version and although many of the principles are the same across the platforms the specifics may be different.
In general I have found using the portable instance has worked well, the only issues being related to when I have had to compile packages that are machine and version specific as it was picking up some leftover entries from an old Windows Python install. I’ll come back to this later but Xformers and Pytorch are two that are particularly difficult when it comes to CUDA software versions. Some of these packages also require C++ libraries and compiler but that is a more advanced topic.
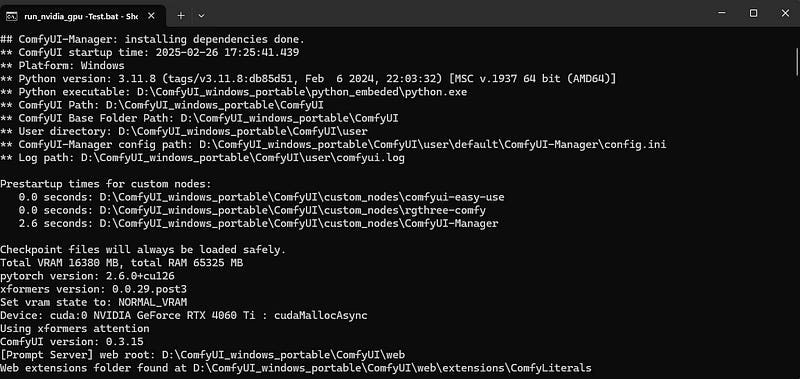
Assuming you have followed one of the guides for installing on Windows then you should end up with a directory called ComfyUI_windows_portable and in it will be a file called run_nvidia_gpu.bat. Double click that and a command window will appear and start the process of launching ComfyUI. After about 20 seconds (and lots of output in the command window), if everything is OK your default browser will launch and open the main ComfyUI window.
The good news is that the basic install of ComfyUI is fairly straightforward, it is far more likely that issues will arise when installing custom nodes. So what is likely to go wrong?
Other Python Versions
As mentioned earlier existing Python installs or remnants of, especially if there are references to it in the Windows PATH variable can cause confusion with PyTorch and custom nodes as they pick up the incorrect version and throw a conflict error. Unless you are using Python for anything else I would try and remove any other versions unless they are entirely self contained. At some point I must have installed a version of Python from the Microsoft Store and that gave me issues until I cleaned it off completely.
The current ComfyUI portable version of Python is 3.11.8, there are more recent Python versions such as 3.13 and 3.14 but these versions have compatibility issues with some custom nodes so being on the latest version is not necessarily the best idea.
CUDA version
The relationship between the CUDA version and compiled packages such as PyTorch and Xformers is critical and can send you in circles as the packages have to be compiled against the right references for the CUDA version. I am currently running CUDA 12.6, although 12.8 has recently been released but upgrading currently only looks necessary for RTX50 series support so I’m not rushing to upgrade as I’m sure it will be painful. You can find your current version in a command window by typing:
nvcc --versionNvidia hold a full archive of install versions at https://developer.nvidia.com/cuda-toolkit-archive
PyTorch
PyTorch is an open-source machine learning library created by MetaAI in 2016 for training neural networks. It is written in C++ and Python and ComfyUI makes use of it. PyTorch has dependencies on CUDA versions and can either be compiled locally or you can use a precompiled version (recommended!). Versions are available at PyTorch. According to documentation precompiled versions of PyTorch include their own CUDA binaries so in theory the Nvidia installed version does not matter. Version 2.6.0 is the current stable release.
Xformers
The official line on Xformers goes something like “The Xformers library provides an optional method to accelerate image generation. This enhancement is exclusively available for NVIDIA GPUs, optimizing image generation and reducing VRAM usage.” All sounds great but in terms of what it actually does I’m not sure — there are some reports it is no longer needed (it is optional) but in general most people still view it as good to have.
If you are lucky then opening a command window in the python_embeded directory and running the command below should install xformers, however, it is important to make sure PyTorch is installed and up to date first or you may well get into version conflicts between PyTorch, CUDA and xformers.
pip install xformersGiven versions can be a bit finickity it can be better to be explicit on the version (details of versions can be found at xformers · PyPI), for example I am currently running version 0.0.29.post3 by using the following command:
pip install xformers==0.0.29.post3Microsoft Visual C++ Build Tools
Some ComfyUI nodes have to compile locally before use, Insightface and ReActor being two such examples, for this to work you need to have Microsoft Visual Studio Build Tools installed. (You need to scroll down the linked page to find the link for the download).