


ComfyUI - Beyond Text Prompts
The Basics of Image-to-Image, ControlNets, Redux and IP Adapters Explored

Writing text prompts is the natural starting place for AI image generation but what about using existing images as a starting point? There are a number of ways to do this, four of which we will cover in this post: Image-to-Image, ControlNets, Redux and IP Adapters.
Before we dive in, it’s worth noting that if you are just trying to change a few small parts of an existing image - removal of an object, a small clothing change, etc. - then there are other methods which are better by being more specialised for the job than an image-to-image workflow. Inpainting and Outpainting are two such techniques which use image-to-image principles but incorporate masking to focus changes. I’ll write a separate post on those topics.
The key thing to understand about image-to-image processing is that you are not working directly on the original image. Instead, the process converts the source image from a pixel-based format into a latent space, where it can be manipulated before being converted back into a pixel-based image. This transformation results in a new image—how similar or different it is from the original depends on several factors, including denoise strength, the additional text prompt, and other workflow elements.
The text prompt plays a crucial role by guiding the model not only in altering the image but also in maintaining key aspects of the original. Many workflows pair image-to-image with an image-to-text model such as Florence2, which generates a detailed description of the input image to help steer the AI’s output.
The second example of using existing images is with ControlNets, which work in an entirely different way. ControlNets pre-process the structure of an existing image to provide data to the model and guide it. There are many different types of ControlNets including:
Edge detection (Canny ControlNet)
Depth estimation (Depth ControlNet)
Pose extraction (OpenPose ControlNet)
Line art & colour mapping
All of these ControlNets can take key structure information from the source image and apply it to the new image but the output image will be entirely different in terms of the finer details.
Controlnets are ideal for when you want to keep the overall structure of an image but change all of the other details. Image-to-image is better for trying to keep more of the original details with smaller changes to certain elements. These two methods are not mutually exclusive and combing them can be very effective.
Flux Redux is a specific model from Black Forest Labs designed for creating image variations, prompted primarily with an image (or multiple images) and an optional text prompt. Its aim is to create an image similar in style to the source but with alterations in composition.
The last tool is the IP Adapter (technically Flux Redux is also an IP Adapter). It is a little different as its main purpose is to change an image rather than replicate it but to do so using specific approaches including merging images or applying style effects to existing images so it fits into the category of image-to-image. Using an IP Adapter is a very powerful technique often referred to as a “1-image LoRA” due to the way it can replicate style from a single reference image.
Simple Image to Image
The most basic form of image-to-image workflow loads the original image, passes it into the VAE Encoder, adds in an optional text prompt and passes it to the sampler with the output going to the VAE Decoder to be converted back into a pixel based image.

The sampler settings are very similar to text-to-image except for the denoise which plays an important role. The lower the value of denoise the closer the image will match the original. As the denoise is increased the image deviates from the original becoming almost entirely different as the value approaches 1. The actual value used will vary in each case but typically around 0.6 maintains a reasonable resemblance to the original image whilst maintaining quality and allowing some flexibility.
The text prompt can help guide the model in the basic image-to-image but its main role is to facilitate any desired changes from the original image. The results of this can be a bit mixed as you have the underlying model trying to replicate the original image and the prompt trying to push the model to do something different.

The results from the very basic image-to-image workflow are somewhat mixed at best so most image-to-image workflows include additional components to improve the output. The first addition is an image-to-text element using a model like Florence2 or JoyCaption to create a detailed description of the input image which is the passed to the text prompt to assist in guiding the model.
Using this approach helps keep the composition of the output image more aligned with the input whilst providing the opportunity to tweak the prompt as required, however, the overall structure may still vary, especially with higher denoise values. This is where the use of a ControlNet comes in.
ControlNets
ControlNets pre-process the source image to extract key information so that it can be passed to the model to guide it. The two most popular ControlNets are Canny, which performs edge detection, and Depth, which as the name suggests extracts the depth information. Although both of these ControlNets achieve something similar their differing approaches will affect the output so depending on the desired result it is often a case of trying each one to see which one works better in a particular scenario.
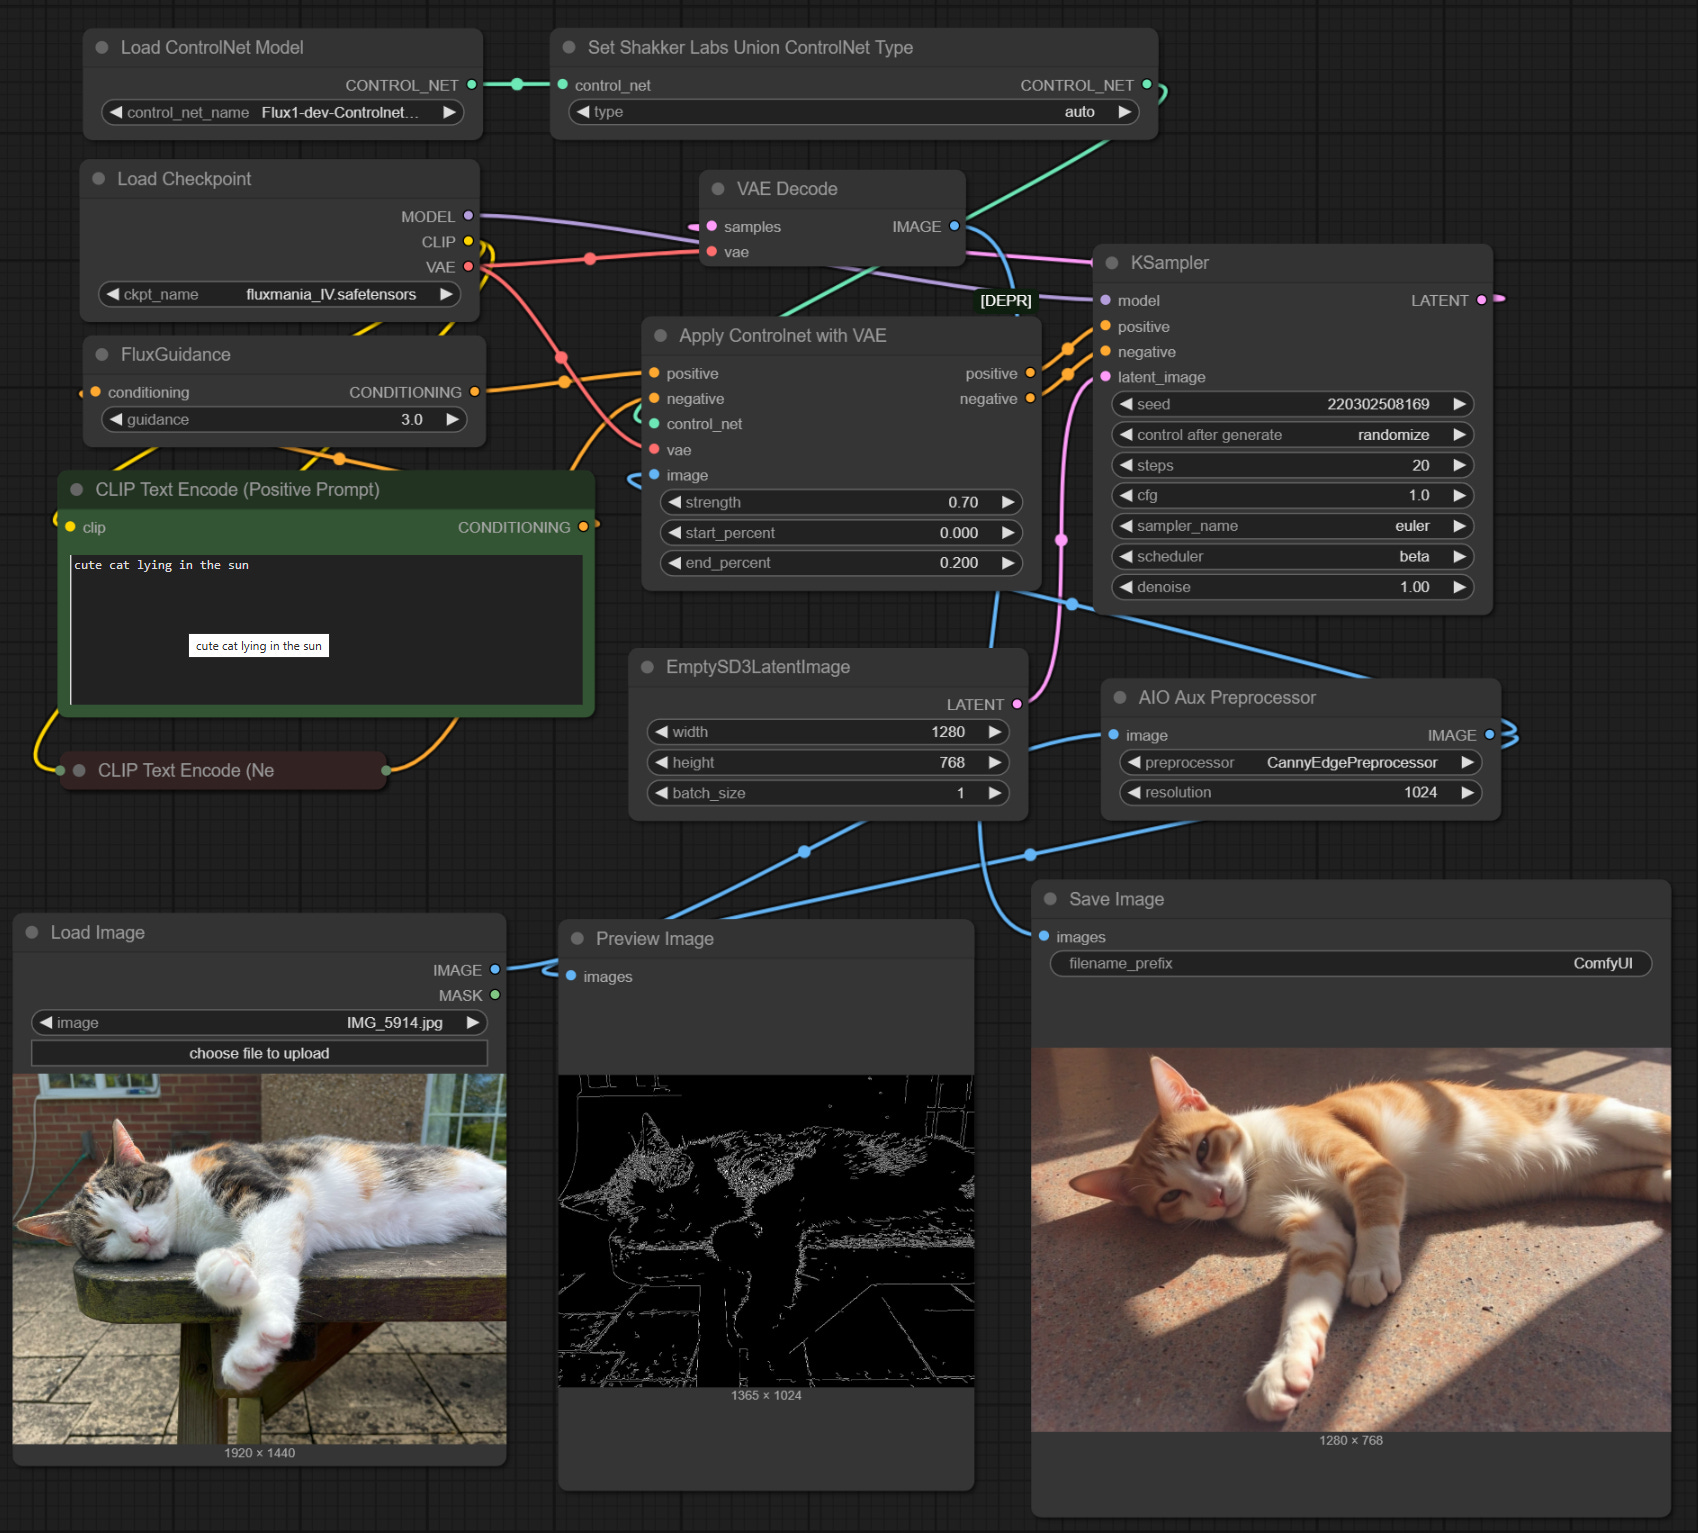

In the two examples above the text prompt has been kept simple but this could be more detailed or driven from a Florence2 input to further guide the model. The key settings on the ControlNet are:
Strength (0-1) - how much the ControlNet influences the model. I tend to use between 0.4 and 0.7. The higher the value the more it will trend to the original image but with the loss of any additional prompt detail.
Start_Percent (0-1) - the point in the denoise process where the ControlNet starts to be applied. Zero is the obvious starting point but there can be cases for starting later.
End_Percent (0-1) - the point in the denoise process where the ControlNet ceases to have any impact. In general a low value of around 0.2 produces the best results.
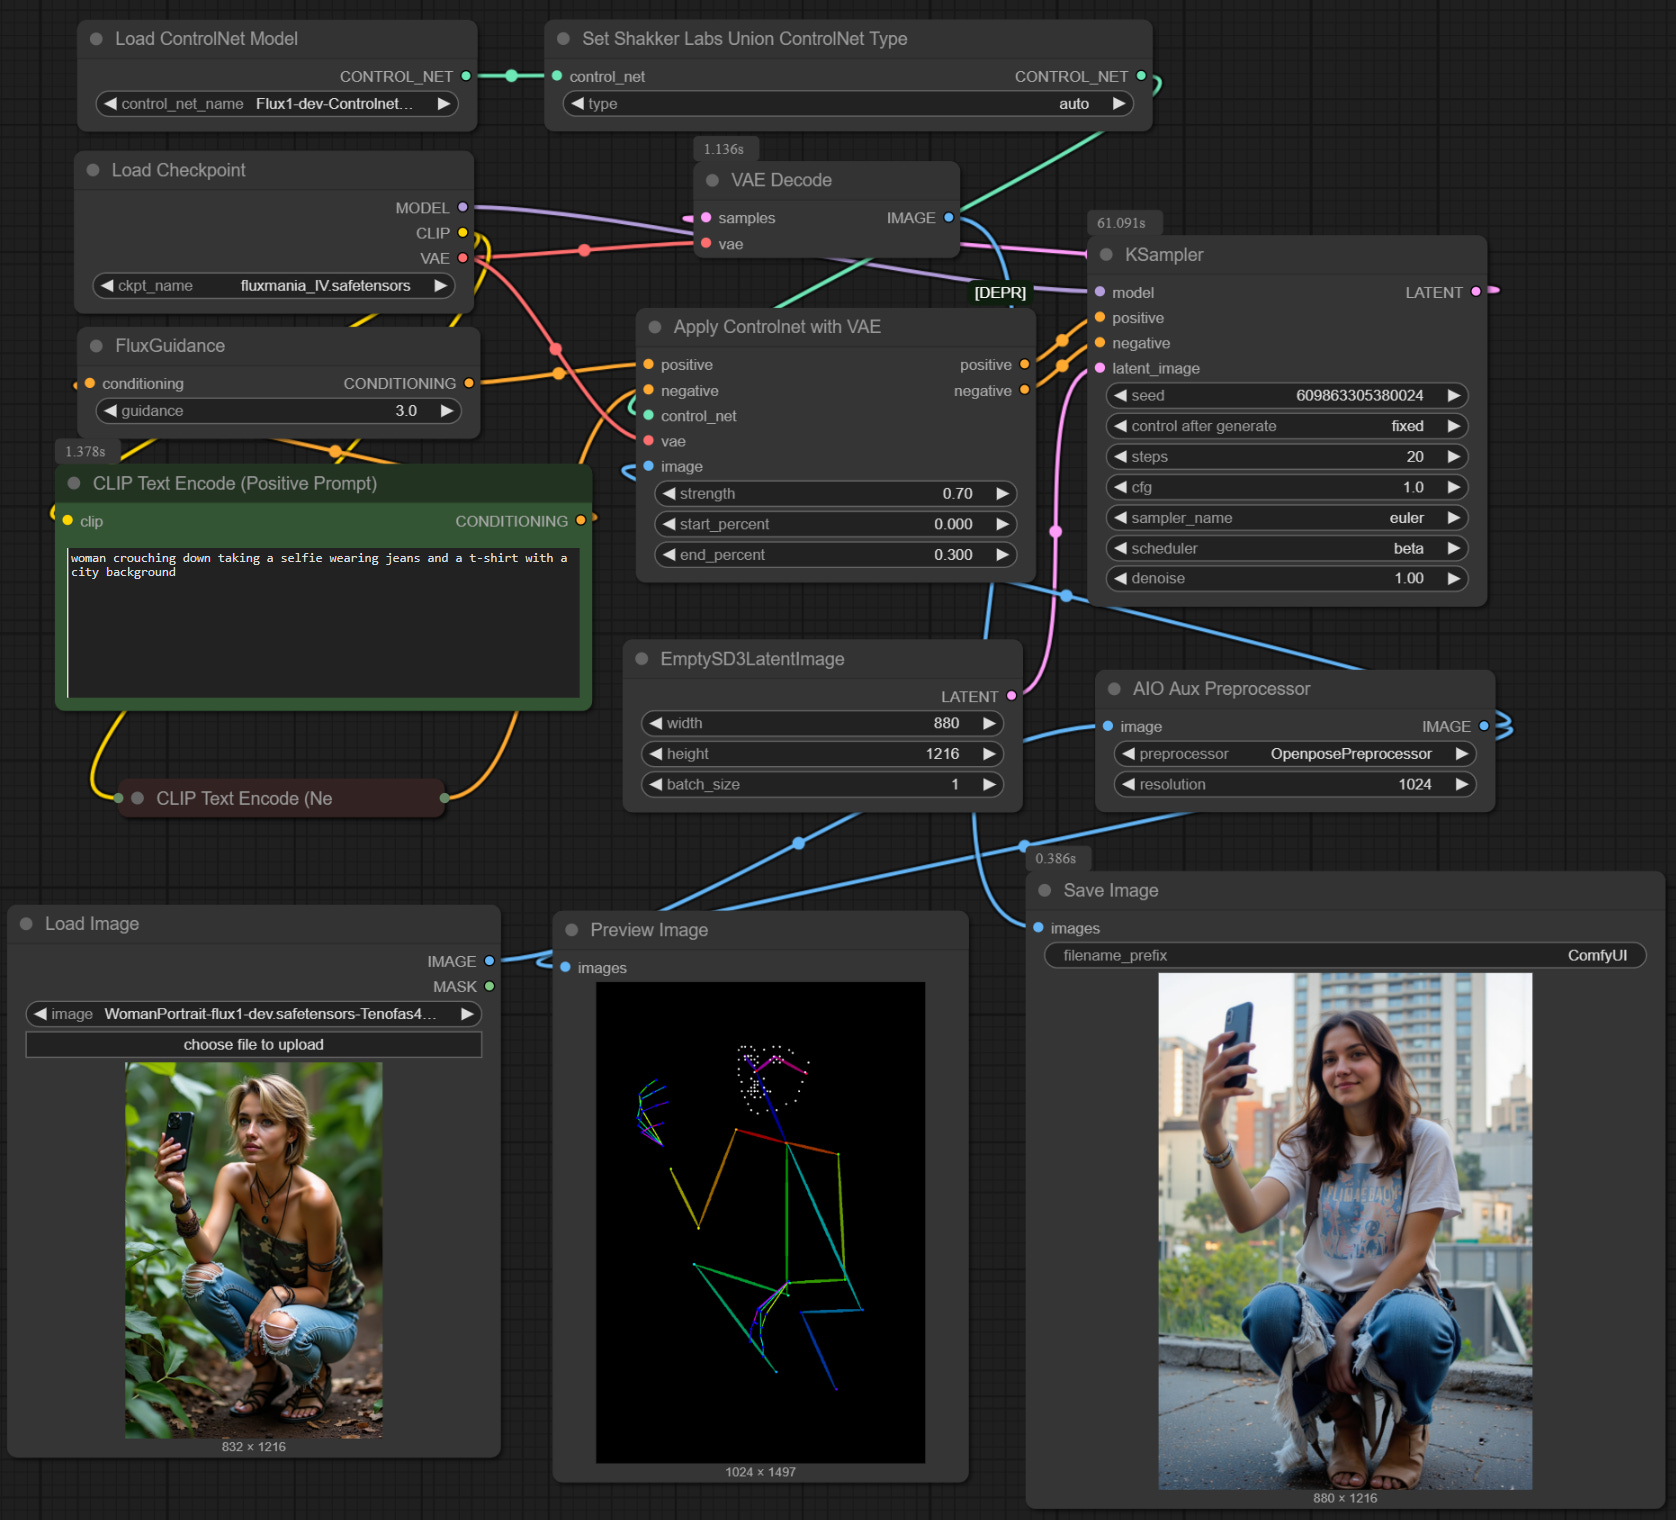
There are a myriad of other ControlNet options aimed at specific cases - pose, line art, colour, luminance, etc. - all of which are interesting to experiment with. One final example below using the OpenPose ControlNet which only really works with human forms.
Flux Redux
Flux Redux requires some installation, details of which can be found on the ComfyUI Wiki along with a detailed tutorial and workflow so I will only cover the basics here. In its most straightforward use you simply load a source image, set it off and the output should resemble the input in style and composition but overall will be a different image.

Flux Redux isn’t limited to one source image, you can combine multiple images and a text prompt to meld styles and composition. The Flux Redux Plus workflow by maDcaDDie is a great example of how you can expand its use with multiple images and a prompt with an easy ratio between images and the prompt.


IP Adapters
Moving into more advanced territory we reach IP Adapters which probably should have a post on their own given their power and flexibility. They are a little more complicated as there are different IP Adapter nodes depending on whether you are using a Flux or SD derived model.
At the time of writing the following IP Adapter nodes are available:
ComfyUI IP Adapter Plus (SD15 & SDXL)
These nodes also tend to have dependencies which require additional installation, for example IP Adapter Plus requires Insightface which has a reputation for being a bit tricky to install.
The IP Adapter Plus is currently the most advanced of the bunch and the functionality does vary across all of them as they were created by different people and organisations. For completeness I will cover the basic concept here but also add some references for deeper reading.
A common use for the IP Adapter is a style transfer - transferring the style of one image onto another. There are plenty of workflows in existence to do this including the excellent Any Image to Any Style workflow by AmadeusXR which I have used for the images below.


In these two examples there is not a style called out by the model or prompt - it is purely using the style image through the IP Adapter, which in these cases were entirely different images from the source image, just images with the style I wanted.
As well as style transfers the IP Adapter can also perform blends and embeds of multiple images in a similar way to Flux Redux (which is really an IP Adapter). The example below is a blend of two images using the IP Adapter Combine Embeds workflow found on the IP Adapter Git Hub page in the examples directory.


For completeness the image below uses the Shaker Labs Flux IP Adapter with the multi IP Adapter workflow and the same images as above showing the difference in interpretation.
The IP Adapter nodes can do much more, including conditional generation, faceID and even animation. Far too much to cover in this basic guide but for more information have a read of the Comflowy Tutorial on IP Adapters, noting that it is referring to IP Adapter Plus using SD models, hopefully the full functionality will be available with Flux at some point.
Summary
Moving beyond simple text-to-image generation into image-to-image workflows unlocks a new level of creative possibilities. While it can be overwhelming at first, experimenting with different techniques will help you build a personalised workflow tailored to your creative goals.
Every method covered here - Image-to-Image, ControlNets, Flux Redux, and IP Adapters - has a unique role, and combining them often produces the best results. AI image generation is much more than just text prompts—the possibilities are endless!